
How to search for a user in the back office?
Who can search for users in the back office?
Admins and Devs can search for users in the back office.
Where do I search for a user in the back office?
To search for a user in the back office, locate the “Community” section in the “Manage” menu.
Open the dropdown. Select “Users.” This will take you to the “Users” dashboard.
There are two tabs at the bottom of the page header. Select “All Users.”

The “All Users” tab on the Back Office “Users” page is highlighted in purple above.
How do I filter the list of users?
Under the “All Users” tab, you will find filters and a list of users.
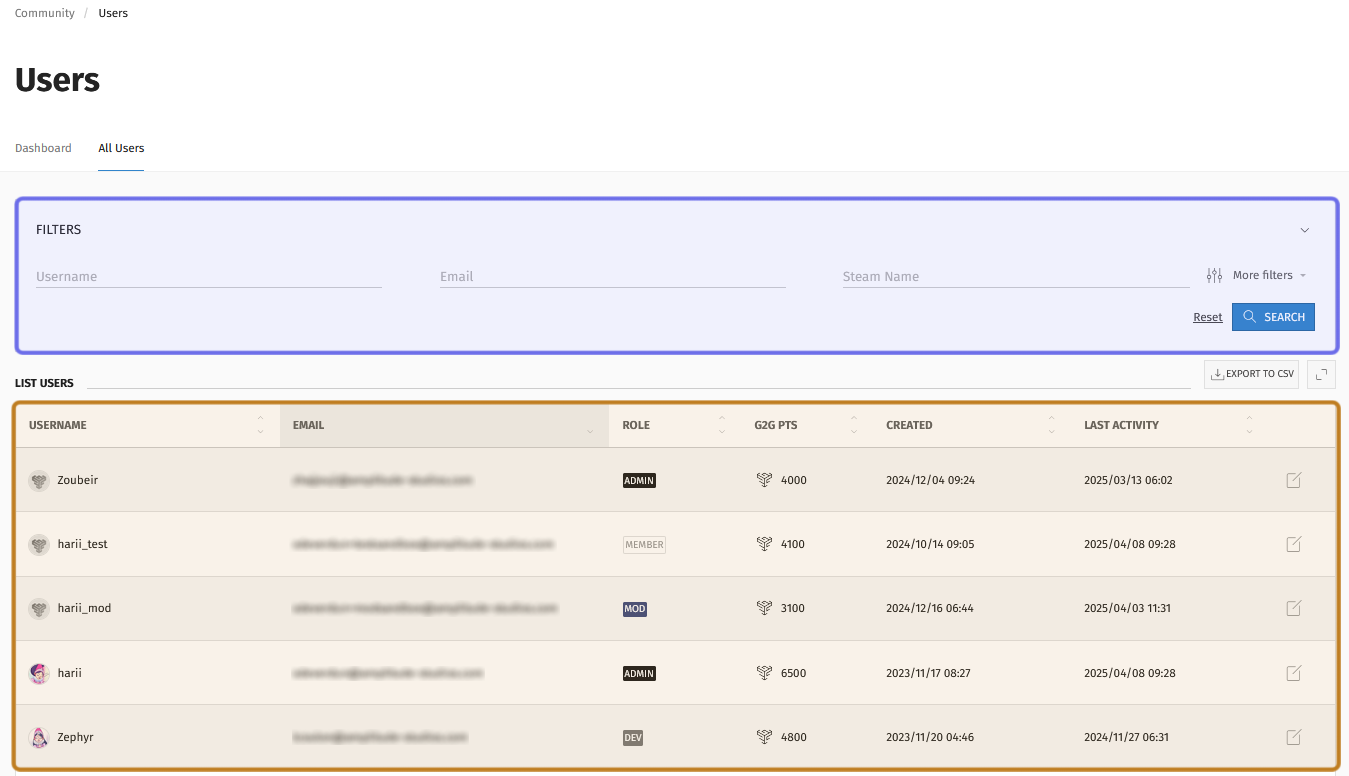
The “All Users” tab is shown above. The “Filters” box is highlighted in purple.
The list of all users is highlighted in yellow.
The most straightforward way to search for a user is to scroll through the user list. However, the filters and column headings can help you narrow down what you’re looking for.
To perform a search, fill in the fields you want to filter the list of all users on and then click the “Search” button.
You can find the “Search” button on the right-hand side of the box labeled “Filters.” It is beneath the “More filters” button.
When you find the user you are looking for, click on their row in the list to be taken to their user page.
The different fields you can filter on are outlined below. You can find additional fields by clicking “More filters.”
Search by username or email
There are three fields in the “Filters” box. Each allows you to search by entering an applicable keyword or string of text.
Username: will search all registered members’ usernames for a match. The list of all users will be filtered to only include usernames that match the search term.
Email: will search on all users’ emails. The list of all users will be filtered to only include emails that include the search term.
Steam Name: will search on the Steam usernames of users with a linked Steam account. The list of all users will be filtered to only include members whose Steam Name matches the search term.
The “Username,” “Email,” and “Steam Name” options are highlighted in purple. The “More filters” button is highlighted above in yellow.
Note: The search is not case-sensitive, but will otherwise only return exact matches. For example, using the search term “e-mail.com” or “email.fr” will not return an email address that ends “email.com.”
More Filters: By activity
If you click the “More filters” button, you will see two date fields that allow you to filter the list based on a user’s activity. You can find these fields next to each other in the top left of the “More filters” box.
The date field on the left is “Created at,” which refers to the date the user registered.
The next date field is “Last Activity at,” which refers to the most recent date the account registered any activity on the site.

You can access the filters shown above by clicking the “More filters” button.
The two date fields are highlighted in purple.
To add a date filter, click the arrow to the right of the date field. Select how you want to filter on the selected date:
“> After” will filter for dates on or after the selected date.
“< Before” will filter for dates before the selected date.
“= Equal” will filter for dates that match the selected date.
Then click on the date field and select a date from the date picker.
More Filters: By Steam account
Users have the option to link their Steam account. Clicking on “More filters” lets you filter users based on their linked Steam account.
You can filter for whether or not a user has a Steam account linked using the dropdown labeled “Steam link.” Click to open the dropdown.
Select “is Steam linked” to filter for users who have already linked a Steam account. Select “is not Steam linked” to filter for users who do not have a Steam account linked.

The “More filters” options are shown above. The “Steam link” and “Steam ID” fields are highlighted in purple.
You can also search based on a user’s Steam ID. The Steam ID is a unique 17-character numeric identifier for a Steam user. To search for a specific user by Steam ID, enter the Steam ID into the field labeled “Steam ID” on the right of the “More filters” options.
More Filters: By profile details
The second and third lines of the “More filters” options have various additional ways to filter the list based on users’ profile details.
Starting on the left, the first field is a dropdown labeled “Confirmed.” Choose “Is Confirmed” or “Is not Confirmed” from the dropdown to filter on whether a user has or has not verified their account.

The “More filters” options are shown above. The profile details fields are highlighted in purple.
The next field to the right filters on the number of G2G points a user has. First, click the arrow on the right-hand side of the field. Choose whether you want to filter for an amount of G2G points that is “> Superior” (greater than); “< Inferior” (less than); or “= Equal” to the number you entered into the field. Then, enter the number you want to filter on.
To the right of the “G2G points” field is the “Role” dropdown. Click the dropdown and select a role. The list of all users will filter to only include users with the selected role. You can add multiple “Role” filters to a search. The resulting list will include users that have any one of the selected roles.
Lastly, you can search based on badges that users have earned. The final dropdown is labeled “Badges.” Click to see a list of all badges.
Each badge in the list can be expanded to show a list of all associated badge quests. Selecting a badge name will select all badge quests. Click on a selected badge quest to deselect it.
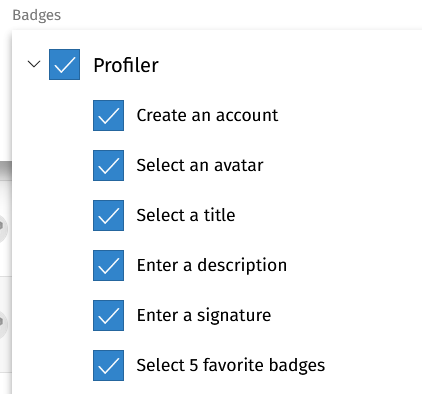
An example of the “Badges” dropdown is shown above. The “Profiler” badge and all the associated badge quests are selected.
You can search on one or multiple filters. If you use the same field multiple times, the list will be filtered using the “OR” operator. For example, if you search for “Role: Admin” and “Role: Member,” the list will show users who have a role of Admin OR a role of Member. If you use different fields, the list will be filtered using the “AND” operator. For example, if you search “Role: Admin” and “Badge: Resolve a “Help” question,” the list will only show only users who are Admins AND who have completed that badge quest.
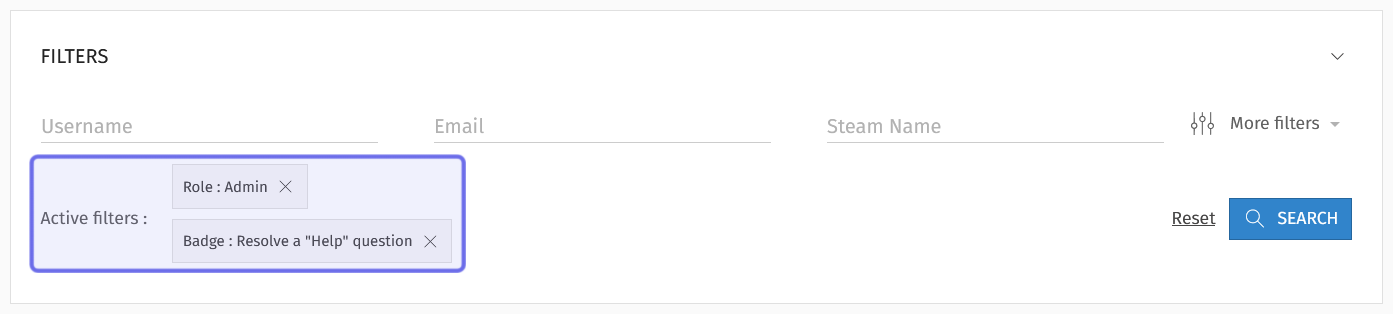
An example of active filters is highlighted in purple above.
Note: All active filters are shown at the bottom left of the “Filters” box. If you want to remove a filter, click the “X” to the right of the filter name. You can then repeat the search minus that filter by clicking “Search” again.
How do I sort the list of all users?
You can sort the list of users by clicking on any of the column headers.
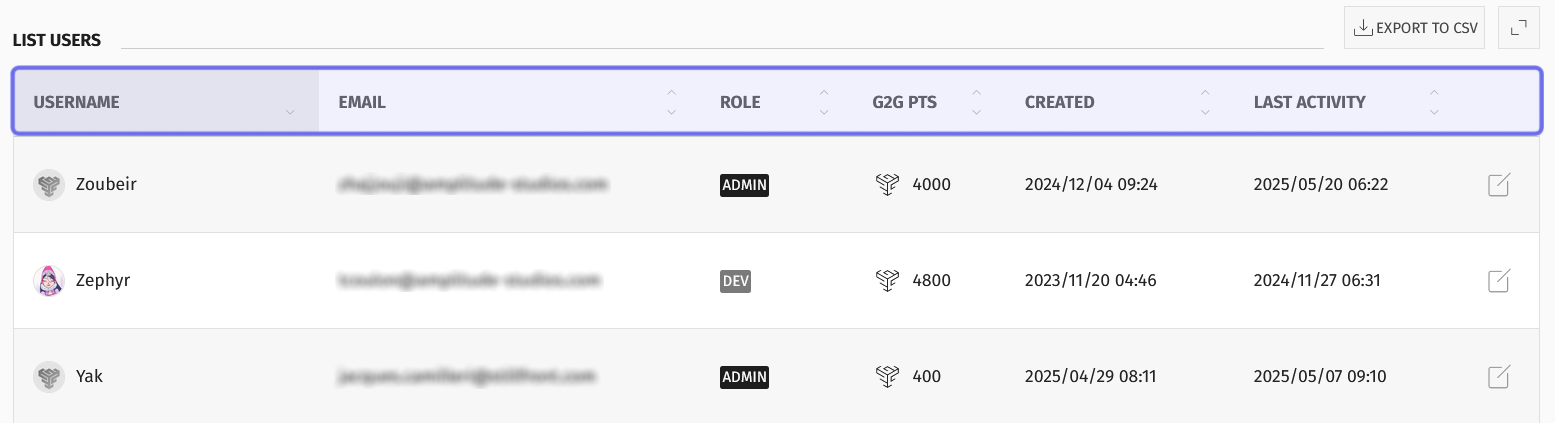
Part of a list of users in the back office is shown above. The column headers are highlighted in purple.
Sorting the list can make it quicker to find the user or users you are looking for, particularly if you searched on one of the sorted columns.
Username: Click once to sort usernames from A - Z. Click a second time to sort from Z - A.
Email: Click once to sort emails from A - Z. Click a second time to sort from Z - A.
Role: Groups roles but not positive how it sorts
G2G Pts: Click once to sort from the lowest number of G2G points to the highest. Click again to reverse the sort.
Created: Click once to sort from the oldest accounts to the most recent. Click again to sort from the most recently created accounts to the oldest.
Last Activity: Click once to show accounts with the most recent activity first. Click again to show accounts that have been inactive for the longest time first.
How do I find my profile in the back office?
If you want to find your own user page in the back office, look in the top-right corner of the back office. You will see your avatar.

The avatar in the top-right of the back office is outlined in purple.
Click on your avatar. A menu will dropdown. Select “View profile.”
This takes you to your user page in the back office. It will look the same as if you clicked on any user in the list on the “All Users” page.