
How to unlock badges by batches ?
Who can batch unlock badges?
Admins and Devs can batch unlock badges.
Where can I batch unlock badges?
You can batch unlock badges in the back office. Click “Gamification” in the “Manage” menu. Then, click “Badges.”
On the right-hand side of the “Badges” page header are three vertical dots. Click on the three dots.
A menu will drop down. Click “Batch unlock.”

The vertical three dots in the “Badges” page header are highlighted above in purple.
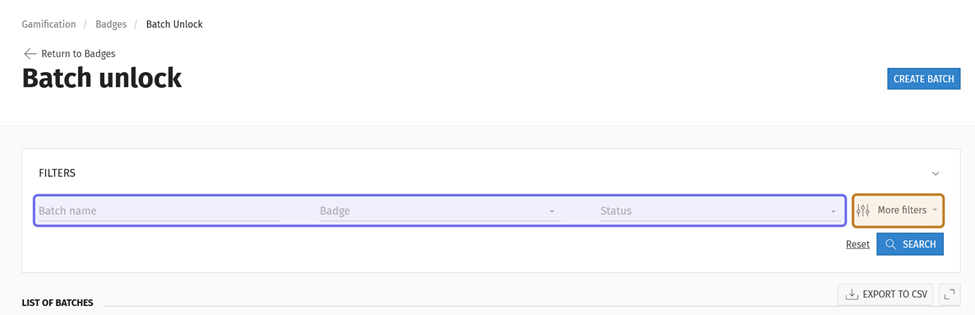
The “Batch unlock” page lists previously created batches. Click the “Create Batch” button in the page header to add a new batch.
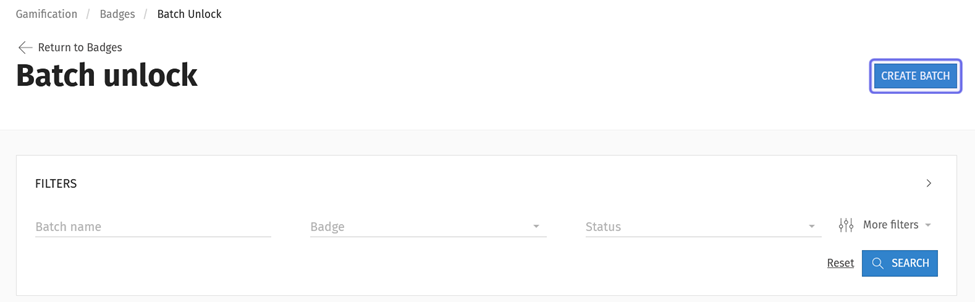
The “Create Batch” button in the “Batch unlock” page header is outlined above in purple.
How do I batch unlock badges?
After you click “Create Batch,” you will see a section labeled “Connect Badge and Users.” Enter a name to identify the batch in the “Name” field.
Click on the “Badge” dropdown to select the badge you want to unlock. The badge unlocks based on a specific badge quest.
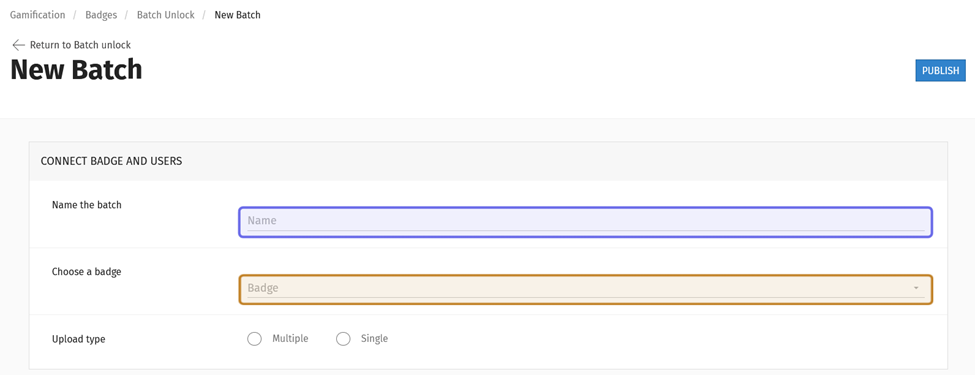
The top of a “New Batch” page is pictured above. The “Name” field is highlighted in purple. The dropdown to select a badge is highlighted in yellow.
The “Badge” dropdown lists all badges. Click on a badge name to show its associated quests. Select a badge quest.

An open “Badge” dropdown is shown above. An expanded badge name with the badge quest visible is highlighted in purple.
Next add users by selecting an option in the “Upload type” row. You can upload a list of users or add one user at a time.
Add multiple users
Select “Multiple” to add members by uploading a .csv file. An “Upload” button will appear when you make your selection. Click “Upload.”
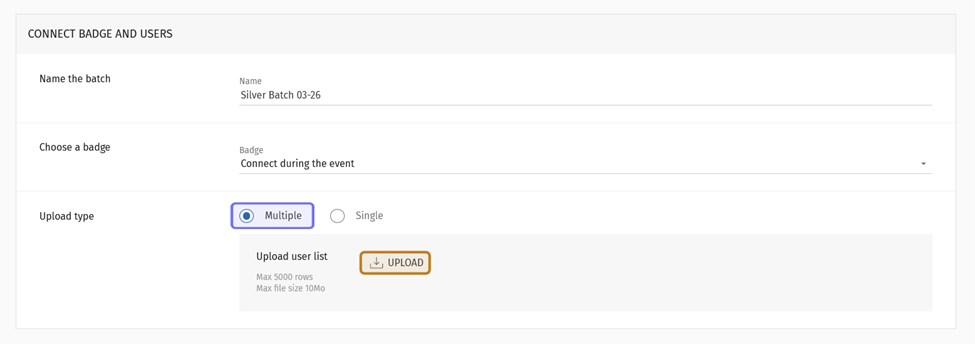
The “Multiple” upload type option is highlighted in purple above. The “Upload” button is highlighted in yellow.
A window will pop up. Click on the block in the center to open and upload a .csv file, or you can drag and drop a file.
The .csv file must have at least one of the following columns:
ID
Username
Registered email
All data for an individual user should be in the same row. At least one of these fields is necessary to locate a user on the platform.
Click “Download the template” to download a .csv file that has been formatted correctly. If your spreadsheet software asks what you want to use to separate values, select a semicolon (;).
Note: You can create a list of members that meets certain criteria by filtering the list of users, and then exporting it to .csv. You will need to re-format the exported .csv in order to use it in batch uploads.
Avoid duplicates by creating one large batch, rather than several smaller ones. You can add up to 5,000 users per batch.
Once you’ve added your .csv file, click “Upload.”
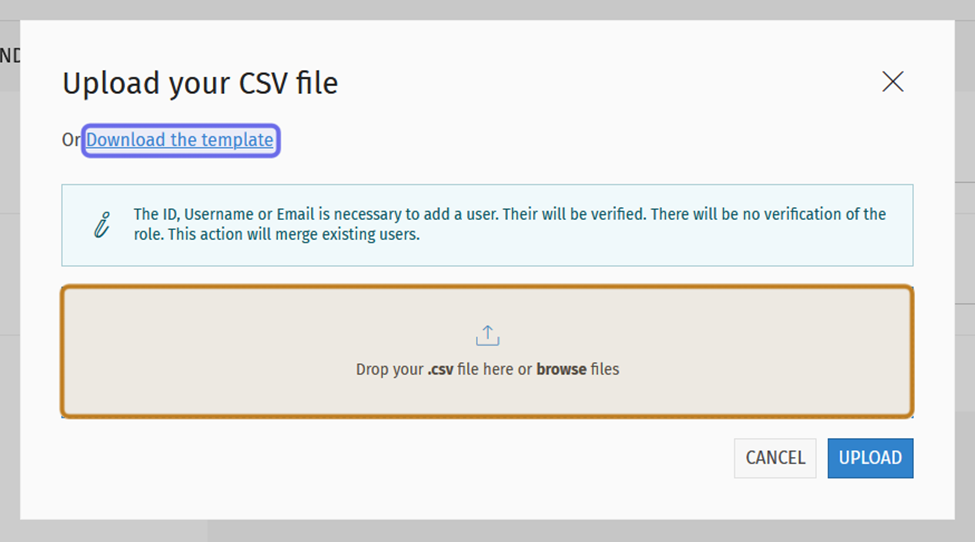
The pop-up window for uploading a .csv file is shown above. The link to download the .csv template is highlighted in purple. The place to drag-and-drop a file or click to open a file browser is highlighted in yellow.
The window will update and display a preview. (This may take a moment if the batch is large.) The preview shows the number of rows expected to upload successfully and the number that are expected to contain errors.
Note: You do not need to resolve the errors in order to upload the list; however, in most cases these rows will not be added to the batch.
To upload the user list, click “Upload.”
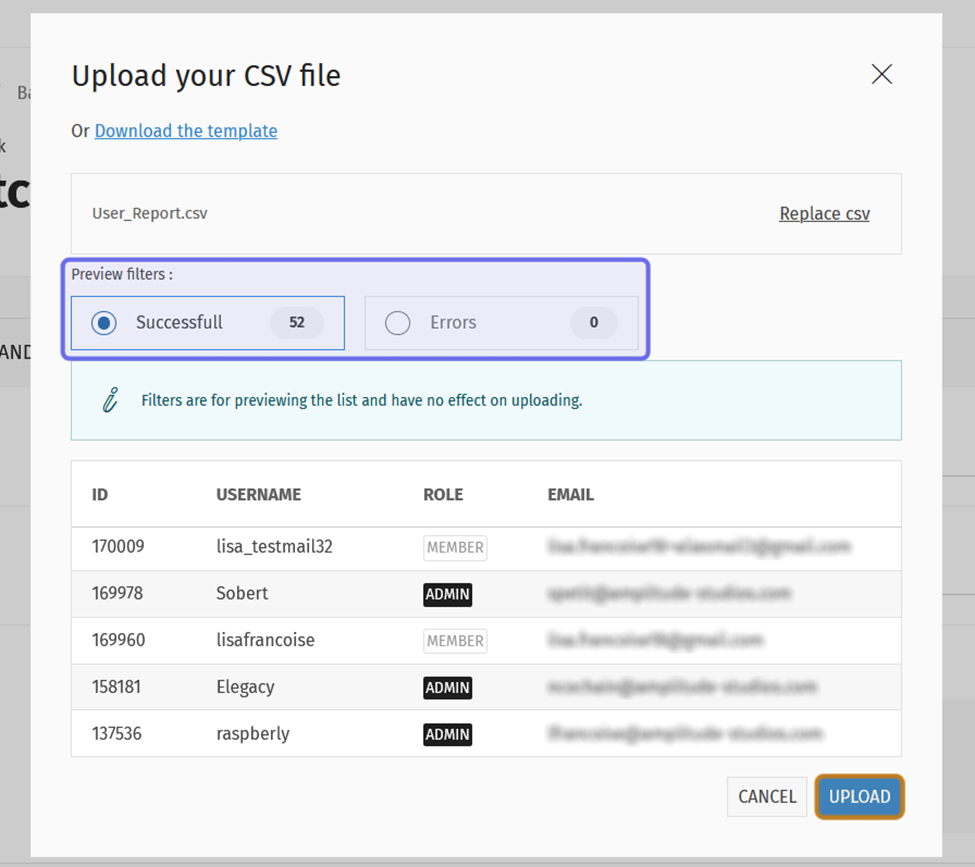
A .csv file preview is shown above. The preview filters are highlighted in purple. This example shows no errors. The “Upload” button is highlighted in yellow.
If errors are anticipated, you will see one or more of the following messages:
“Where Id, Username or Email was not found,” which means that the user could not be found based on the information provided in a row.
“User was not found,” which means a user was not found who matches all the information in a row, when multiple columns in the row are filled.
“With duplicated info, these rows will be automatically merged,” which means that information in this row matches another row in the list. In this case, the matching rows will be merged and the user will be added to the batch.
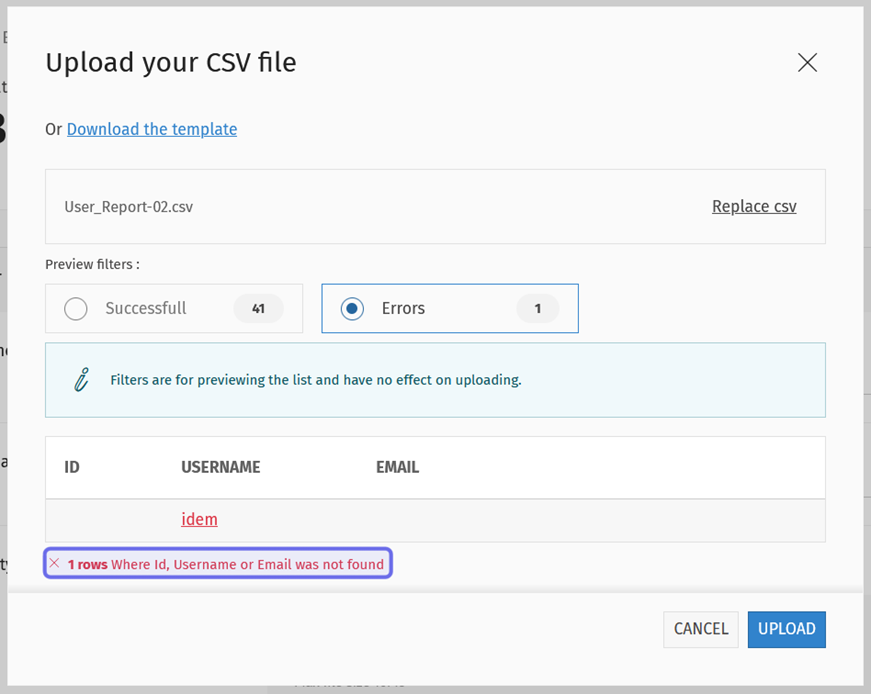
In the preview above, there was one anticipated error. The error message is outlined in purple.
Add a single user
To add a single user, select “Single.” Two fields will appear below your selection.
First, select whether you want to locate the user by their User ID or by their username. Then, enter the matching information into the text field.
Note: If adding a username, matching options will appear below the text field as your type.
Click “Add.”
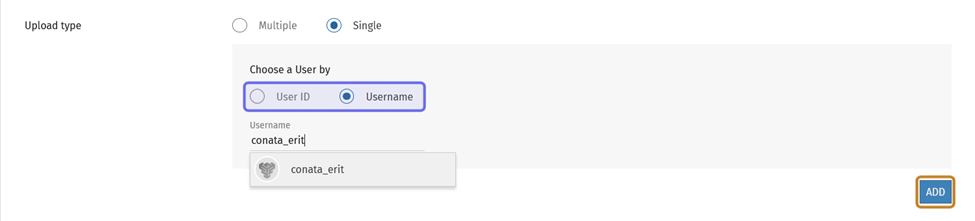
The “Single” upload type option is selected above. The options to identify a single user are highlighted in purple. The “Add” button is highlighted in yellow.
A confirmation message will pop up if the user is successfully added.
If the user can not be added, a red error message will appear below the “User ID” or “Username” field. A user cannot be added if the information provided matches a user already in the batch or does not match a user.
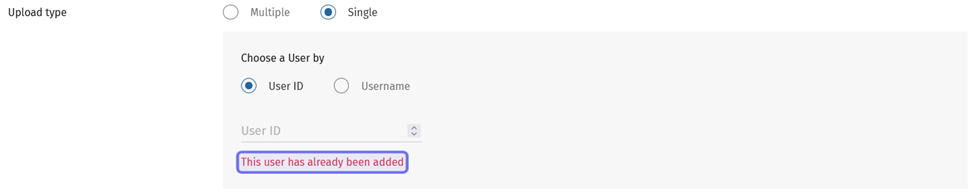
In the image above, a new user could not be added. The error message is outlined in purple.
As you add users, they will appear in the list of users at the bottom of the page.
Publish
Once you’ve added all the users to the batch, click the “Publish” button in the page header.

The “Publish” button is shown highlighted in purple above.
You will be redirected back to the “Batch unlock” page and the new batch will appear in the list of all batches.
Note: Avoid unlocking multiple large batches at one time. This will slow the progress.
You can check the progress of the batch in the “Status” column. You can check the status of the unlock for an individual user in the batch by clicking on the “Edit” button to the right of a batch’s status.
Can I add users to an existing batch?
You can add users to a finished batch by clicking the “Edit” button on the right-hand side of a row in the list of batches. To add new users, the batch must have a status of “Published.”
A batch can have one of the following four statuses:
Unpublished: the batch has been published, but the badge has not yet been unlocked for any users in the list. This status is only rarely seen as the badge unlock process typically begins very quickly.
In Progress: the badge is in the process of being unlocked for all users in the batch. This status includes a percentage that indicates how many badge unlocks have been processed from the batch.
Published: when an “In Progress” batch reaches 100%, the status updates to “Published.”
Partially published: the batch has finished running, but there was an error when unlocking the badge for one or more users.
Note: If you publish a batch with zero users, it will be added to the list of batches with the “Published” status assigned immediately.
You can check the progress of batches that you’ve previously created on the “Batch unlock” page. The “Status” column is the rightmost column in the list of batches.
Use the “Filters” box to display only batches with the “Published” status. Click the “Status” dropdown and select “Published.” You can select a different status to filter for that status instead.
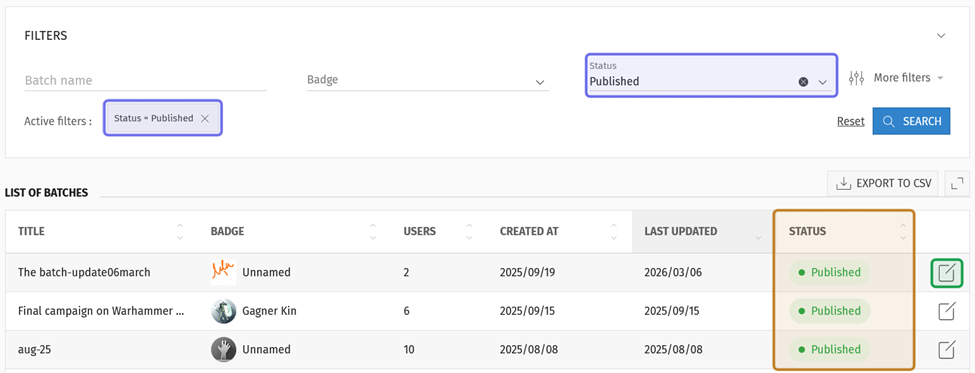
The “Status” dropdown in the “Filters” box is highlighted in purple above. It is set to “Published,” which adds an active filter, also highlighted in purple. The status column, only displaying published batches, is highlighted in yellow. The “Edit” button is highlighted in green.
You can further narrow down the list using the other fields in the “Filters” box.
Enter a term or phrase in “Batch name” to search for a batch whose name matches the search term. Hit “Enter” or click “Search” to search on the term by adding a new filter.
Click the “Badge” dropdown to filter for a specific badge. You can filter the list of batches for one or more badge quests. Select a checkbox or checkboxes, then click “Search.”
To select a single badge quest, click the arrow to the left of a badge name. This will expand a list of all of the badge quests associated with that badge. Click the checkbox to the left of the quest name to add a filter for that quest.
Click the checkbox to the left of a badge name to automatically select all of the badge quests associated with that badge.
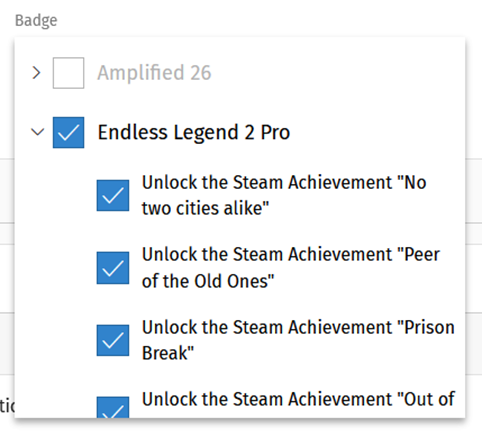
An expanded “Badge” dropdown is shown above. The badge name was selected, so all the badge quests were selected automatically.
Click on “More filters” to filter by date. This will open a “Created at” and a “Last updated” field.
The “Filters” box is shown above with the filter fields highlighted in purple. The “More filters” button is highlighted in yellow.
Both time fields have a dropdown on the right-hand side. The dropdown displays a greater-than sign (>) by default. Click the greater-than sign to drop down the menu. Then, select an operator.
Select “> After” to display batches created or last updated after a specified date.
Select “< Before” to display batches created or last updated before a specified date.
Select “= Equal” to display batches created or last updated on a specified date.
Click on the date field. A date picker will drop down. Select the date you want to search on from the calendar.
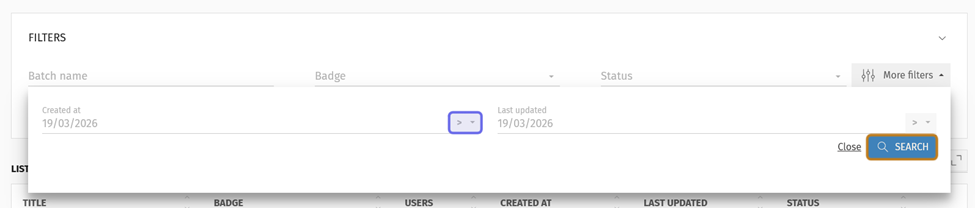
The date fields are shown above. One of the dropdowns to select an operator is highlighted in purple. The “Search” button is highlighted in yellow.
You can sort a filtered or unfiltered batch list by clicking on any column header to re-sort the list. For example, if you click on “Title,” the list will sort alphabetically based on batch names.
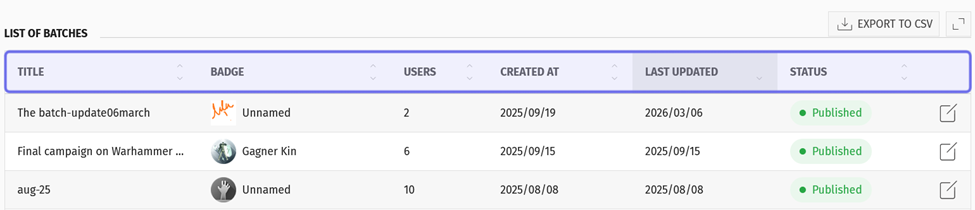
An example list of batches is shown above. The column headers are highlighted in purple.
Once you’ve found the published batch you want to add users to, click the “Edit” button on the rightmost side of the row. A new page will open with the information about that batch, as well as a list of the users included in the batch.
Add new users by following the same process as when you created the batch.
You can check the progress of the badge unlocking for each user by checking the “Status” column of the list of users. For a published batch, all users will have the “Published” status.
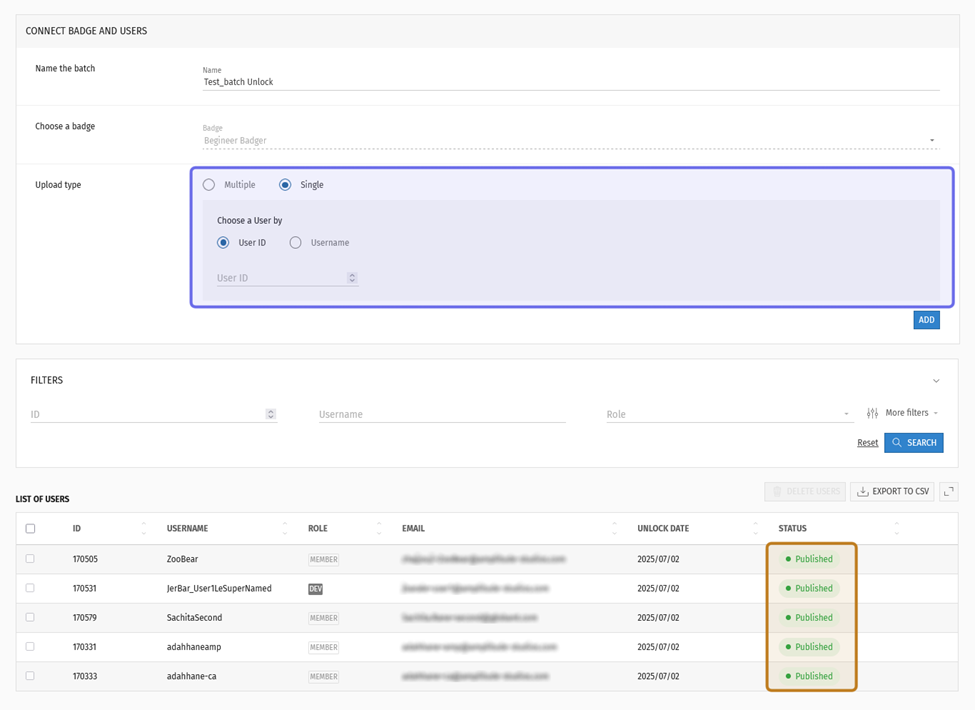
The option to add a single new user to an existing batch is shown highlighted in purple above. The status of the badge unlock for users already in the batch is highlighted in yellow. The status for all users is “Published,” so new users can be added to this batch.
When you add further users to the batch (or view a batch with a status other than “Published”) you may see the following statuses:
Unpublished: the badge quest hasn’t been unlocked for the user yet.
In Progress: the badge quest is in the process of being unlocked for the user.
Published: the badge quest has been successfully unlocked for the user.
Error: there was an error that prevented the badge quest from unlocking.