
How to manage access keys?
Who can manage access keys?
Devs and Admins can manage access keys.
Where can I manage access keys?
You can manage access keys in the back office. To create and manage access keys, click on “Community” in the “Manage” menu. Select “Access Keys” from the menu that drops down.
The “Access Keys” page will open.
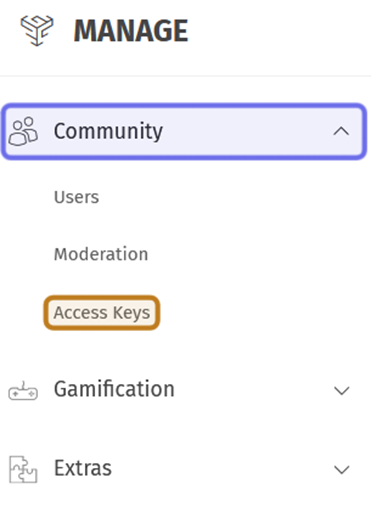
The top of the back office “Manage” menu is pictured above. The “Community” dropdown is highlighted in purple. “Access Keys” in the submenu is highlighted in yellow.
How do I navigate the “Access Keys” dashboard?
At the top of the “Access Keys” page is a summary of the keys generated. You can see the number of keys generated overall, the number of keys that have been used, and the number of keys still pending.
Below the summary is the “New Campaign” box where you can create a new campaign to generate additional keys.
At the bottom of the page is the list of campaigns. The list is a table with five rows.
“Name” shows the name used to identify the campaign
“Created Date” shows the date that campaign was created and its keys generated.
“Number of Keys” shows the total number of keys that were generated.
“Used Keys” shows the number of keys that have been used to access account registration.
“Pending Keys” shows the number of keys in the campaign that have not been used yet.
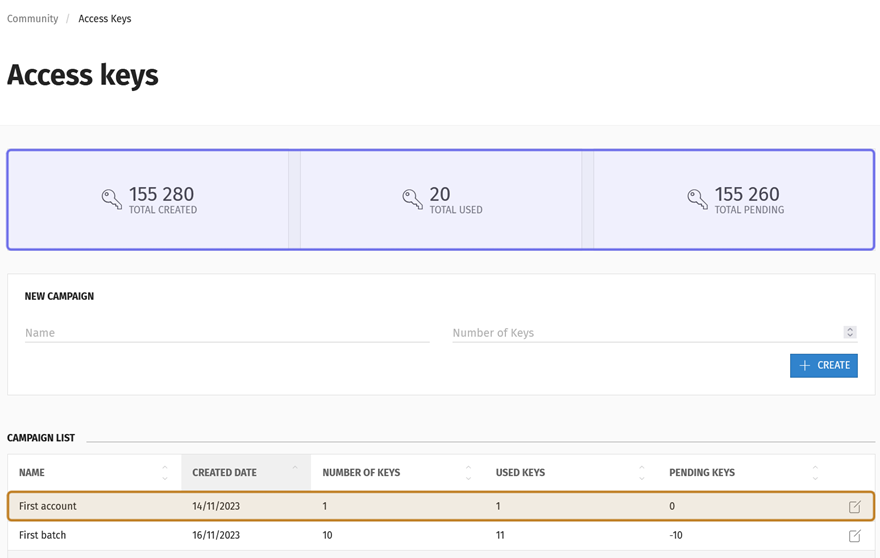
The “Access Keys” dashboard is pictured above. The summary is highlighted in purple. A row in the campaign list is highlighted in yellow. Clicking on the row in yellow will open the campaign dashboard.
Click on any row in the list to access campaign details.
How do I create access keys?
Near the top of the “Access Keys” page is a box labeled “New Campaign” with two fields.
Enter a name to identify the batch of keys in the “Name” field.
Enter the number of keys you want to generate in the “Number of Keys” field. You can type an integer or use the arrows on the right to increase and decrease the number of keys by one.
Note: You can’t increase the number of keys after creating a campaign. To generate further keys, you will need to create a new campaign.
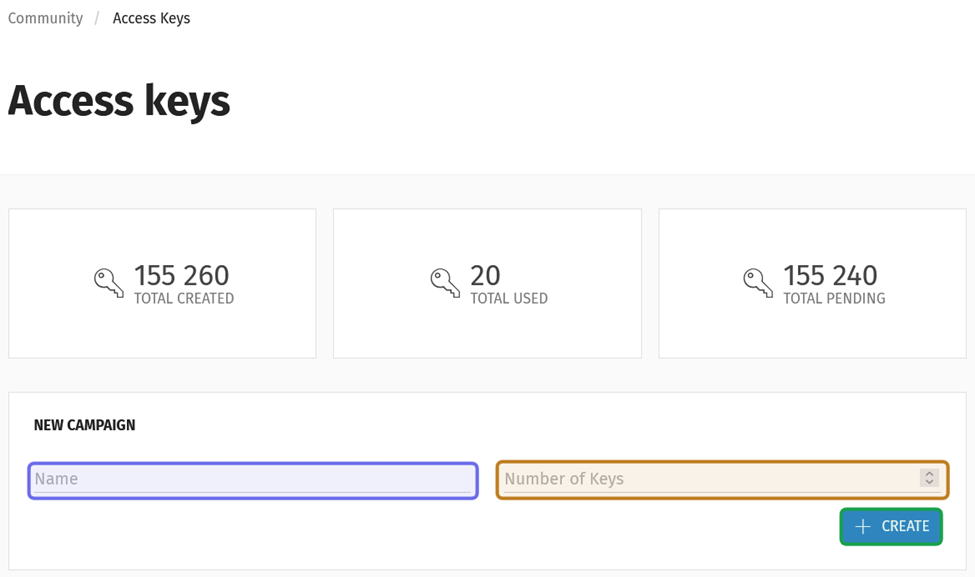
The “Access Keys” page is shown above. The “Name” field is highlighted in purple. The “Number of Keys” field is highlighted in yellow. The “Create” button is outlined in green.
Click “Create.”
A new page will open showing the campaign details. Scroll down to see the list of generated keys.
Note: You can export the list of keys to a .csv file by clicking “Export Keys” in the page header.
As keys are used to access account registration, the “User” column will populate with the name of the user who used that key.
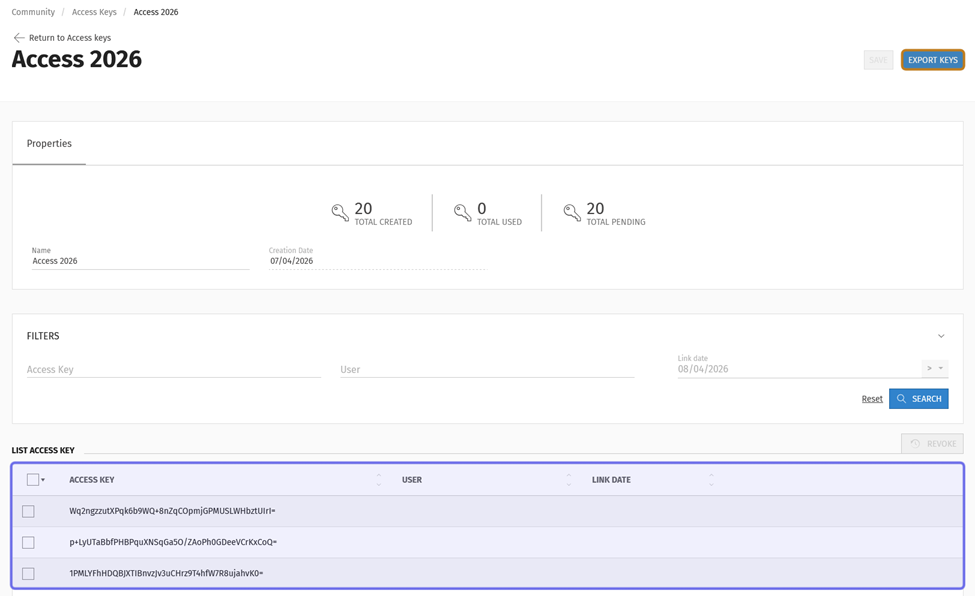
The list of access keys is at the bottom of the campaign details page, highlighted here in purple. The “Export Keys” button is in the page header on the right-hand side, outlined in yellow.
What can I find on the access key campaign dashboard?
At the top of the campaign details page, the “Properties” box displays a summary of keys for an individual campaign. You can see the total number of keys generated when the campaign was created, the number of keys that have been used, and the number of keys waiting to be used.
The campaign name and creation date are also displayed in the “Properties” box. The “Name” field can be edited.
To change the campaign name, replace the name in the “Properties” box with a new name. Then, click “Save” in the top right.
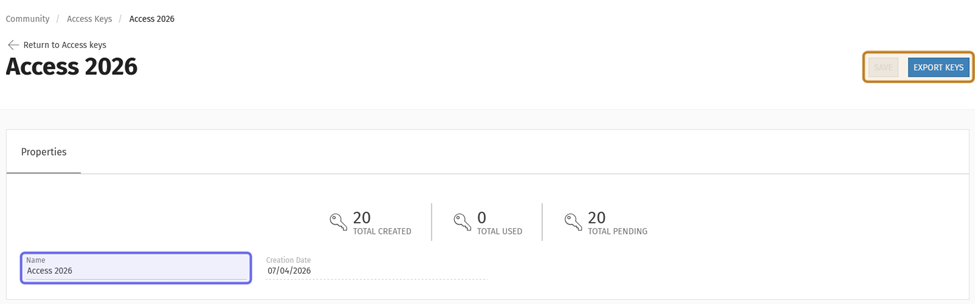
The “Name” field is highlighted above in purple. It is the only field that can be edited. The “Save” button is shown greyed-out and outlined in yellow. Next to the greyed-out “Save” button is the “Export Keys” button, also outlined.
You can search for a specific key or subgroup of keys using the “Filters” box.
Note: “Export Keys” will not export a filtered list. It will always export the full access key list.
You can filter based on the key that was generated, if you know the access key in whole or in part. Enter it in the “Access Key” field and hit “Search.”
Search for a specific user by typing a username into the “User” field. As you type, usernames that match what you have entered will appear below the field. Select a user and click “Search.”
Use the “Link Date” field to filter by the date an access key was used. To filter by a date, click the arrow to the right of the field. Then, select whether you want to search for access keys that were used “After >,” “Before <,” or “Equal =” to a given date. Click on the date field and select a day from the calendar to specify the date.
Note: You can also sort the access key list by clicking on any column header.
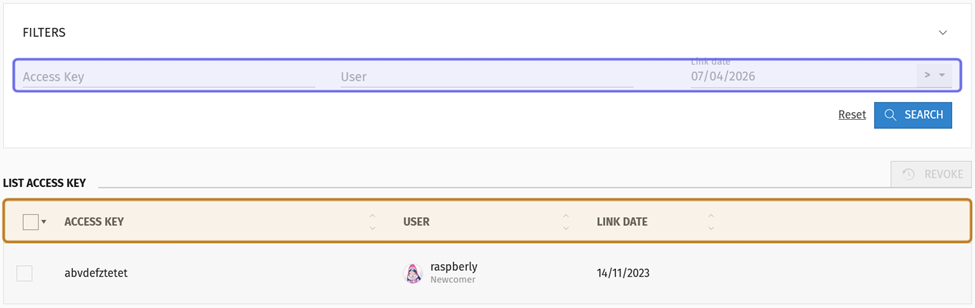
The filter options are highlighted in purple above. The column headers that can be used to sort the list are highlighted in yellow.
How do I revoke an access key?
You can revoke a key on the access key campaign dashboard.
Scroll down to the list of access keys.
If a key has not been used, you can revoke an unused key by clicking the checkbox to the left of the access key. Then, click “Revoke.” The “Revoke” button is located above the list on the right.
Note: A used key cannot be revoked.
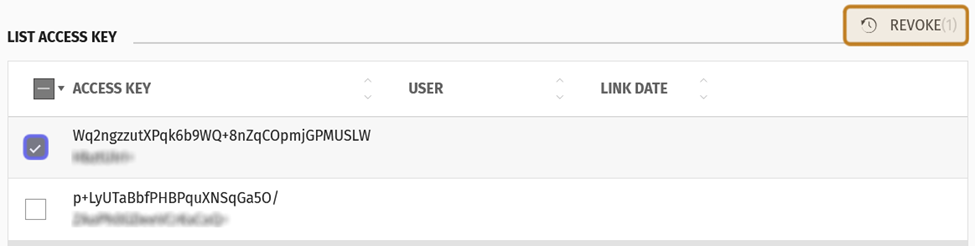
A list of access keys is shown above. The checkbox to select a key is outlined in purple. The “Revoke” button is outlined in yellow.
Once a key or keys are revoked, the summary at the top of the page will update to reflect the new numbers of keys.

An updated summary is pictured above. It shows 19 created keys, in contrast to the 20 shown earlier in this article.
Note: If a user accessed account registration via a key and later deletes their account, that key will be removed from the list, but not from the total created.