
How to create a Universe
Who can create a Universe?
Only Admins can create a new Universe. To create a new Universe, you must have created a Studio first.
Where can I create a Universe?
You can create a Universe in the back office. Click on “Pages” in the “Manage” menu.
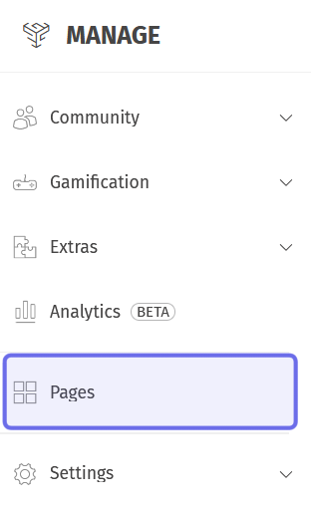
The “Manage” menu is pictured above. “Pages” is highlighted in purple.
How do I create a Universe?
To create a Universe, click “Create” on the right-hand side of the page. Select “Universe” from the dropdown. If you haven’t created a Studio yet, you won’t see “Universe” in the dropdown.

The “Pages” header is shown above. “Create” is outlined in purple. The dropdown is expanded and “Universe” is outlined in yellow.
You can also add a Universe directly from a Studio. Click on a Studio listed under “Pages.” Then, click “Create Universe” in the top-right of the page.
Note: If you click a Studio with no Universes, the Universe creation window will open automatically.

The header of a Studio in the back office is pictured above. The button to create a new Universe is outlined in purple.
A window will pop up. Enter a name for your Universe in the “Universe name” field. The name of a Universe is typically a game title. There is a 100 character limit.
Note: A Universe name is visible across the platform and used to generate URLs. You can change the Universe name later, but changing the name will break any external links back to this Universe.
Visibility on a new Universe is set to Admin by default to give you time to configure the Universe. You can edit this later.
The “Navigation highlight” dropdown is set to “Recommended” by default. To set the navigation to “Legacy,” click on the dropdown and select “Legacy” from the list.
Note: When a Universe is added to a navigation section, it is added at the bottom of the section. Learn more about configuring navigation on G2G here.
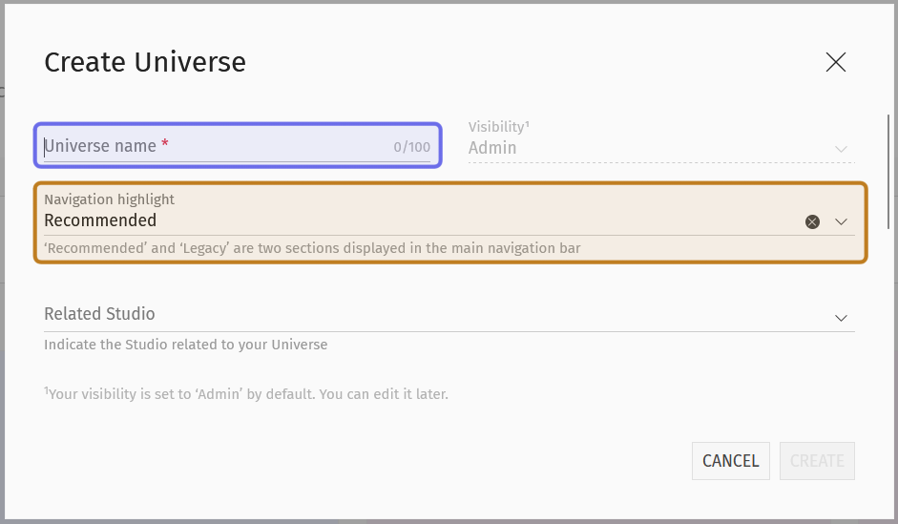
The “Create Universe” pop-up window is shown above. The “Universe name” field is highlighted in purple. The “Navigation highlight” dropdown is highlighted in yellow. It is set to the default value of “Recommended.”
Next, link the new Universe to an existing Studio. Each Universe must be linked to a Studio. A Universe cannot be moved between Studios.
Click the “Related studio” dropdown. Then, select a Studio from the list. If you opened Universe creation from a Studio page, the dropdown will be greyed out with that Studio automatically assigned.
Note: You cannot change the related Studio once the Universe is created.
Click “Create.”
A confirmation message will appear briefly in the bottom-right of the page. The confirmation message includes the option to “Undo.” If necessary, you can delete the Studio later.
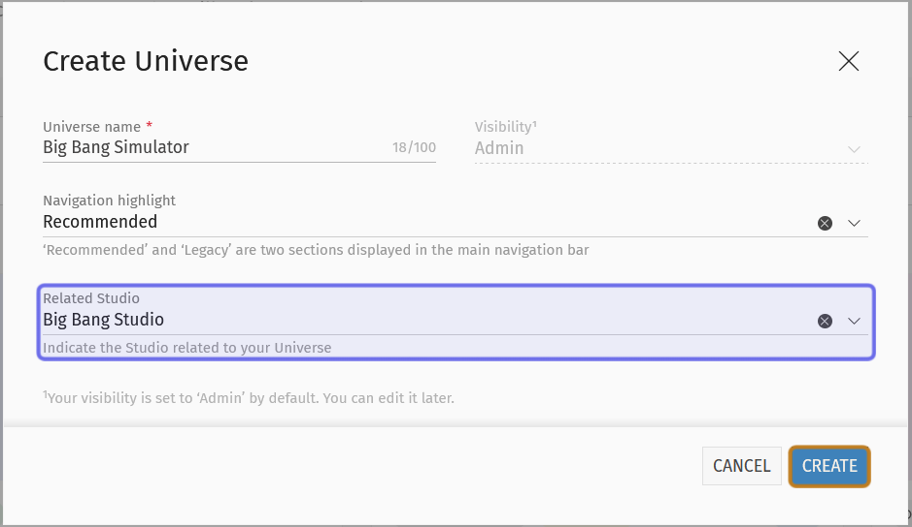
In the “Create Universe” window shown above, the “Related Studio” dropdown is outlined in purple. The “Create” button is outlined in yellow.
You can find the new Universe on the page of its linked Studio. Click on the Universe to finish setting it up.